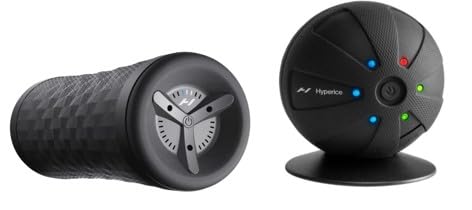
Foam rolling is a simple way to release muscle tightness, improve blood flow, and speed up recovery. Whether you are new to fitness or a seasoned athlete, using a foam roller correctly can make a big difference in how your body feels. This guide covers the basics: what foam rolling is, how to do it safely, and step-by-step instructions for your back, legs, and glutes. You will also learn common mistakes to avoid so you get the most benefit without injury.
What Is Foam Rolling?
Foam rolling is a form of self-myofascial release. Your muscles are wrapped in a thin layer of tissue called fascia. When fascia becomes tight or sticky from overuse, poor posture, or lack of movement, it can restrict your muscles and cause discomfort. Foam rolling applies pressure to these areas, helping to break up adhesions and restore normal tissue glide.
Think of it like giving yourself a deep tissue massage. The roller works out knots and trigger points, which are sensitive spots in the muscle. By applying sustained pressure, you signal your nervous system to relax the muscle, which can improve flexibility and reduce soreness.
Foam rollers come in different densities. Softer rollers are best for beginners or sensitive areas. Firmer rollers provide deeper pressure. Some have textured surfaces for more targeted release. If you are new, start with a softer roller and gradually progress.
Basic Foam Rolling Techniques
Before you start, there are a few key principles to keep in mind. These techniques apply to all muscle groups and will help you roll effectively and safely.
- Warm up first. Roll on warm muscles. A light 5 minute walk or dynamic stretch can increase blood flow and make rolling more comfortable.
- Use slow, controlled movements. Move about one inch per second. Rushing can cause muscle guarding and reduce effectiveness.
- Spend time on tight spots. When you find a tender point, hold pressure there for 20 to 30 seconds. Breathe deeply and let the muscle relax.
- Roll along the muscle length. Go from one attachment point to the other. For example, on your thigh, roll from just above the knee to the top of the leg.
- Keep your core engaged. This protects your lower back and helps you control pressure.
- Limit each area to 60 to 90 seconds. More is not better. Over rolling can cause inflammation and bruising.
Always roll both sides of your body, even if only one side feels tight. This maintains balance and prevents compensation.
Rolling Major Muscle Groups
Now let us walk through the most common areas: back, legs, and glutes. Follow these steps for each muscle group.
Upper Back
- Place the roller on the floor and sit in front of it, leaning back so the roller is under your shoulder blades.
- Cross your arms over your chest or place your hands behind your head for support.
- Lift your hips slightly and use your feet to roll from your mid back up to your shoulders.
- Avoid rolling directly on your lower back (lumbar spine) or neck. Stop at the ribcage.
- When you find a tender spot, pause and breathe for 20 seconds.
- Roll slowly for 60 seconds total.
Hamstrings (Back of Thighs)
- Sit on the floor with the roller under your thighs, just above the back of your knees.
- Place your hands behind you for support, with fingers pointing forward.
- Lift your hips off the floor and roll from your knees to your glutes.
- Keep your legs relaxed and your toes pointed or flexed, whichever feels better.
- Pause on tight spots for 20 to 30 seconds.
- Roll for 60 seconds per leg, or both legs together if you prefer.
Quadriceps (Front of Thighs)
- Lie face down with the roller under your front thighs, just above your knees.
- Prop yourself up on your forearms. Keep your elbows under your shoulders.
- Engage your core and roll from your knees to your hips.
- For more pressure, lift one leg off the roller and put more weight on the other.
- Roll slowly and pause on any tender areas.
- Do this for 60 seconds per side.
Calves
- Sit on the floor with the roller under your calves, just above your ankles.
- Place your hands behind you and lift your hips.
- Roll from your ankles to just below your knees.
- To target the outer calf, turn your leg slightly inward. For inner calf, turn it outward.
- Pause on tight spots and roll for 60 seconds per leg.
Glutes
- Sit on the roller with it under your glutes. Lean back on your hands for support.
- Cross one ankle over the opposite knee to increase pressure on one side.
- Roll over the glute muscle, avoiding the tailbone and lower back.
- Move in small circles or back and forth slowly.
- Hold on any trigger points for 20 to 30 seconds.
- Switch sides after 60 seconds.
Remember to breathe throughout. Holding your breath increases tension and works against the relaxation effect.
Safety Tips and Common Mistakes
Foam rolling is generally safe, but there are important precautions. Avoid rolling directly on bones, joints, or the lower back. Do not roll over varicose veins, open wounds, or areas of inflammation. If you have osteoporosis, herniated discs, or are pregnant, talk to your doctor first.
Common mistakes can reduce effectiveness or cause injury. Here are the top ones to avoid:
- Rolling too fast. Quick movements do not allow the muscle to relax. Slow down.
- Using too much pressure. You should feel a strong sensation, but not sharp pain. Back off if it hurts intensely.
- Rolling the lower back. This can strain your spine. Stick to the upper back and thoracic area.
- Holding your breath. Breathe deeply to help muscles release.
- Rolling for too long. Overdoing it can cause soreness and bruising. Keep sessions under 15 minutes.
- Ignoring pain. If you feel sharp or radiating pain, stop immediately and consult a professional.
Hydrate after rolling. Water helps flush out toxins released from the tissue. Also, pair foam rolling with stretching for best results. Roll first, then stretch the same muscle group.
Foam rolling is a valuable tool for anyone who sits at a desk, exercises, or wants to improve mobility. Start with a softer roller, follow these techniques, and listen to your body. Consistency matters more than intensity. A few minutes a few times a week can keep your muscles supple and reduce post-workout soreness.